 |
| Kami Extension |
The corona virus has changed how education run in this year. Believe it or not, eight months has passed since students left the school campus to their family home for safety. And we don’t know how much longer we should stay at home and conduct almost everything online.
We already started our home based learning since March 2020. Fortunately, our school already moved to technology integrated classroom or paperless education as we say three years prior to this big event, so that our teachers and students already get used to the basics of teaching and learning online.
One of the main challenge in teaching online is how interaction is very much limited. Although online meeting and teleconference has been popular, teacher and students cannot have two ways communication as freely as they used to have in normal classroom.
What I feel really different between meeting students physically and virtually is the way I can give them direct feedback. Normally during lesson, you can walk to student’s desks, talk to them directly, pointing and correcting their mistakes directly on their devices, notebooks, or paper handouts. But during online learning, my hands cannot reach them. Sometimes I wish that my hands can pass through the laptop screen and directly fix their mistakes!
I can only give them instructions like “... the upper right, no no, the more upper one, yes yes, that coil turn … “ and student still react,”Which one is called coil, Miss?”
Then I would just remind my self, be patient, try again.
So I began searching for different apps that can help me to interact directly on student’s work while they are still progressing on their work. One of them is Kami app.
Why using Kami Extension
Students are already familiar with it
Student actually get used to Kami way before I know it. They would open all pdf handouts I gave using Kami Extension on Google Chrome so that they can directly annotate on it. As students are already familiar with them, I don’t have to do extra work to explain how to use it.Paid teacher version is awesome, but free is just as awesome
So I tried the trial of the teacher version. But once the trial ends, the free version is just as awesome. You can basically do what you want to do, minus the class roster. But that’s fine, I already have Google Classroom.Kami facilitate students response in flexible forms
Especially, handwritten. As I am teaching physics, my students need to derive equations, draw diagrams, mark certain figures, and many other things that cannot be done by typing.It can be integrated with Google Classroom
Well, you can actually directly integrate it with Google Classroom. From Google Classroom you can click directly Make Kami Assignments, so they are connected in the Kami app. But without this feature, it will also work as well. I don’t actually use it because I am using the free version.How to Use Kami for Effective Interaction
Add Kami Extension to your Chrome Browser
Before you use Kami, you need to add the extension to your browser. You can go to official Kami website, or search it from you Chrome Web Store.
 |
| Search Kami at Chrome Webstore |
Click 'Add to Chrome'. You can skip this step if green 'added' label is already seen there.
A pop-up will appear that says it can read your data on the website you visit. Don't worry, click 'Add Extension'. If extension is successfully added you can see them at the right corner of your browser, under the puzzle piece symbol of 'Extensions'.
If this is your first time using Kami, you will be required to login to your Google account or signup with email. I suggest you to choose login using your Google account, because you will be using Kami with your Google Classroom. Also, it is faster that way. 😁
 |
| Kami login |
Because you connect it with your Google Account, there will be a pop-up to ask permission from Google. Click 'Allow'.
Next, Kami will ask you to complete your sign-up. Depending on your role, you can choose types of your institution, your role, etc. For example, here I choose K-12 school and my role as teacher.
Yay! Your Kami is ready. Because I choose my role as teacher, Kami automatically upgraded my account into Teacher Plan for 90 days trial.
Use Kami to Replace Whiteboard
 |
| Open Kami |
You can use Kami in different ways. Two of my favorite is to use it as replacement of whiteboard and as live online handout for students.
If you want to use Kami as whiteboard replacement,
- You can start by opening a new tab on your browser.
- Click the icon for extension, the puzzle piece at the top right corner,
- Click Kami Extension.
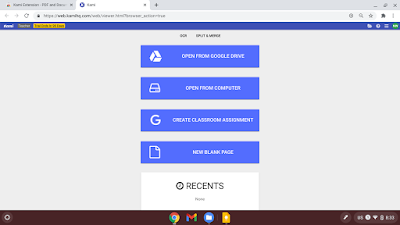
- Choose 'New Blank Page'. What is amazing about Kami is that you can choose your blank page to be plain, ruled, grid, or even music sheet. This is very helpful for teachers. I often use grid because I draw graph a lot during my lesson.
- Kami will give you 1 blank page, but don't worry you can add more pages by clicking + button at the bottom of the page.
- While your whiteboard is ready, you can start screen-sharing with your students.
- Write on Kami as if it is a whiteboard. Add more pages if you need more space. You don't have to clean it.
- You can save and download the pages, and upload them as materials in Google Classroom.
Use Kami to Check Real Time Student Progress
You can also use Kami to check real time progress of your student's work-in-progress and give direct feedback. Well, actually it will be much easier if you have the paid Teacher Plan, but I will give you a tips to use it with free plan, after the 90 days trial ends. Here is how:
- You need to have your pdf ready before hand. You can use Kami to make it or make it offline from other softwares.
- You will upload your handout in Google Classroom as assignment. Choose 'make a copy for each student' to directly name the documents with student's name.
- Get your students ready in the teleconference (Zoom, Google Meet, etc.) and open their Google Classroom at the same time.
- Give students oral and written instruction of what they should do (below)
- Ask your students to open the assignment handout you just uploaded with Kami.
- Ask your students to click share
- Ask your students to copy the sharing link, and paste it to their assignment as handed attachment or private comment.
- Your students can start to work on their handout and you can check their Kami while they are working.
- If you need to give feedback you can directly talk to your students while you both writing on that same Kami document. Screen sharing if helpful, but don't forget to ask permission first because students might not want his/her unfinished work to be seen by his/her peers. If the students does not give permission, then you can make a breakout room only for you and the student while the other students are in the main session.
Those are how I use Kami extension to make my online classroom more engaging. Change and challenges will always come when we are into teaching. We should always learn and adapt. I hope this post is useful for you. Or maybe you have experience using Kami extension or other apps while teaching, feel free to share in the comment below.


This is interesting application! It looks cool. Maybe I will try using this application when I teach my student. Thanks for your sharing :)
ReplyDeleteThis is the first time i get to know about kami extension. Very interesting and useful!
ReplyDelete